
 |
2nd Light Forums |
 |
 |  |


|
Topic Title: Rebuilding the Gheenoe! Topic Summary: Created On: 12/18/2008 08:24 PM |
Linear : Threading : Single : Branch |
|
 Topic Tools Topic Tools
|

 12/18/2008 08:24 PM 12/18/2008 08:24 PM


|
|
|
I just realized how much time it takes to upload pictures and write this out!
Well, a little over two years ago my uncle gave me his late 80's Gheenoe 15'4" Highsider as a graduation gift. Needless to say, I was stoked! Ever since then I've been thinking of ways to customize her. With the semester over and the weather complacent enough to actually do what I've been wanting, I decided to go for it. What I settled on was to put a hollow deck in the stern, a console in the center, and a little deck in the bow. I'll show you the progress my dad and I have made this week. Note: I didn't think of taking any "before" pictures prior to tearing her apart. A couple weeks ago I noticed my transom was leaking rust, so that got taken down. The wood was water logged and rotting. So, all the wood got taken out and the transom got beefed up with some 'glass. We ground it flush with the plate on the back. 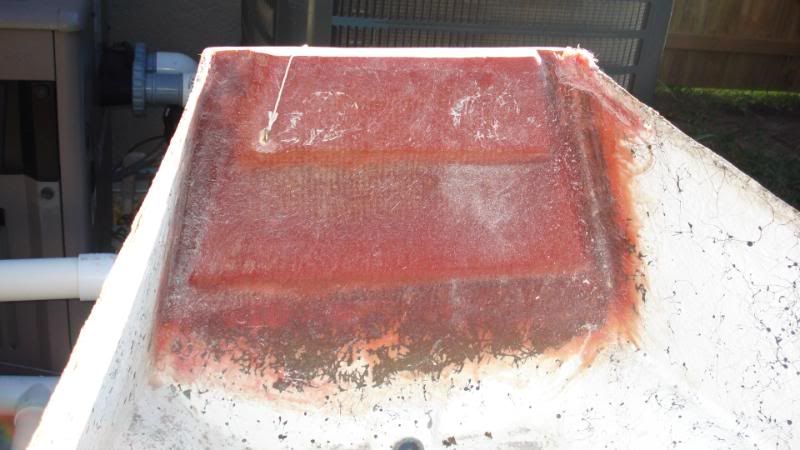
We decided that the stern was going to be the first priority. For that to be done, the back seat had to be taken out and ground flush. 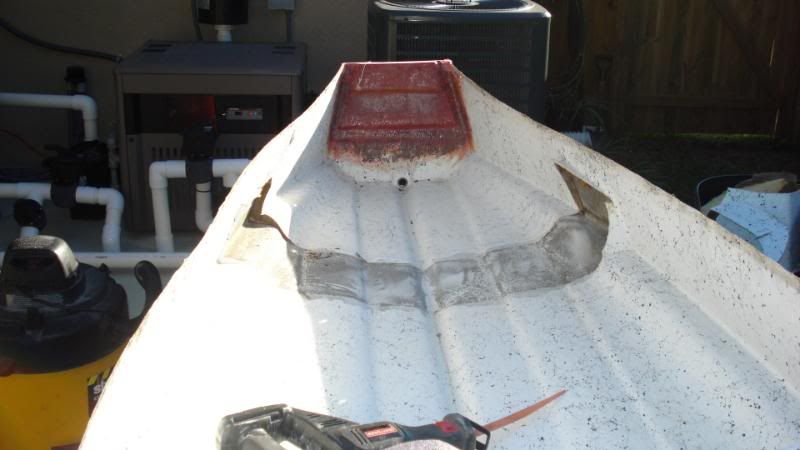
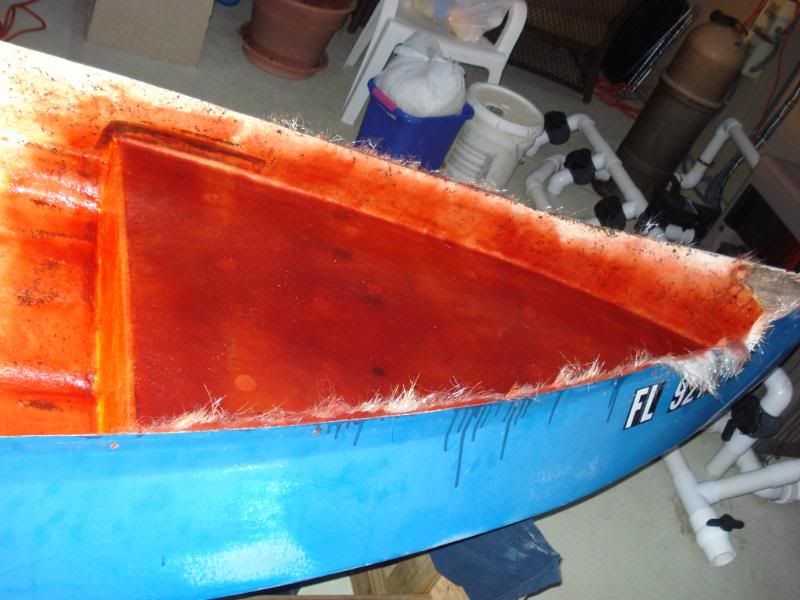
Once the remnants of where the seat was got to the point where it was flush with the rest of the floor, the whole back end of the Gheenoe was prepped to glass. I know Gheenoes are supposed to be on the thin side but it felt really thin so we wanted to add another 4 oz. of 'glass to it. 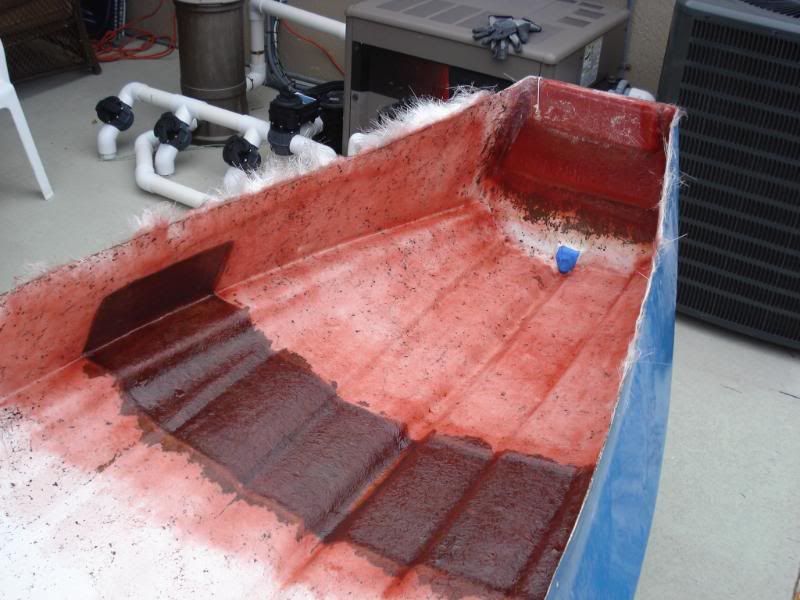
When the 'glass kicked, we took templates for what is to be the back deck. We transferred the templates to ½ inch plywood. 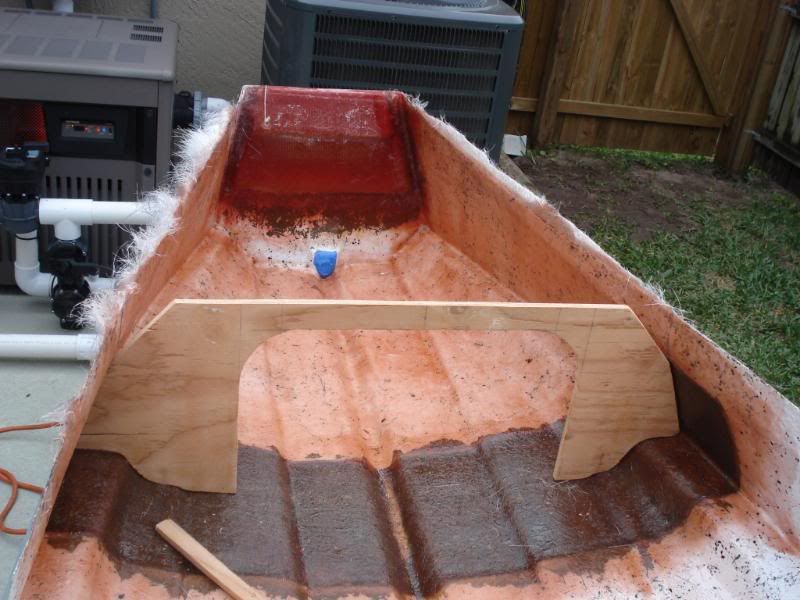
To add some support to the deck, we figured 3 ribs would suffice. So, we had to take templates for two more ribs. Once they fit right, we put some putty on them and set 'em in place. 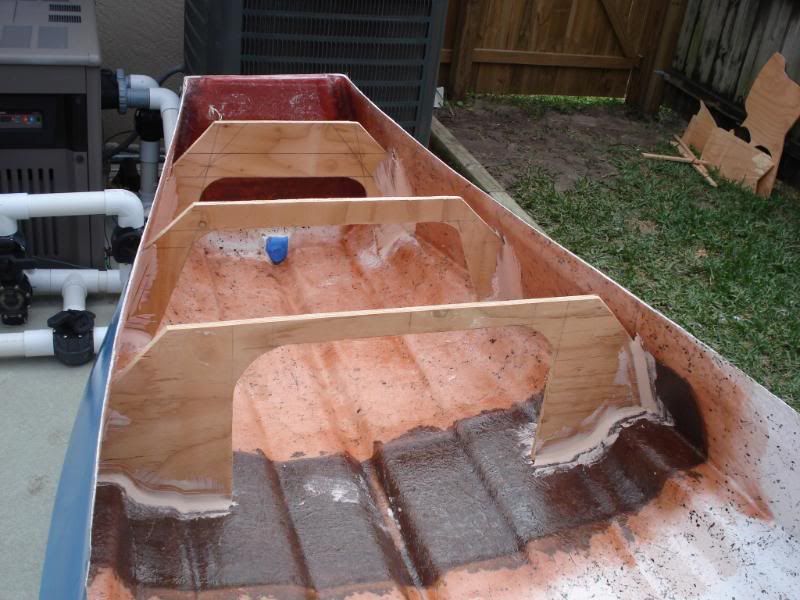
If you pay close enough attention, you may notice the transom not being level to the deck/ribs. We found out that the transom is off. So, we used measurements from the keel and chine to sight everything in and floated it in my pool to make sure the decks were level. With the ribs in place, the next obstacles to tackle were the top sides of the deck. Again, we took templates, stapled, and puttied them in place. 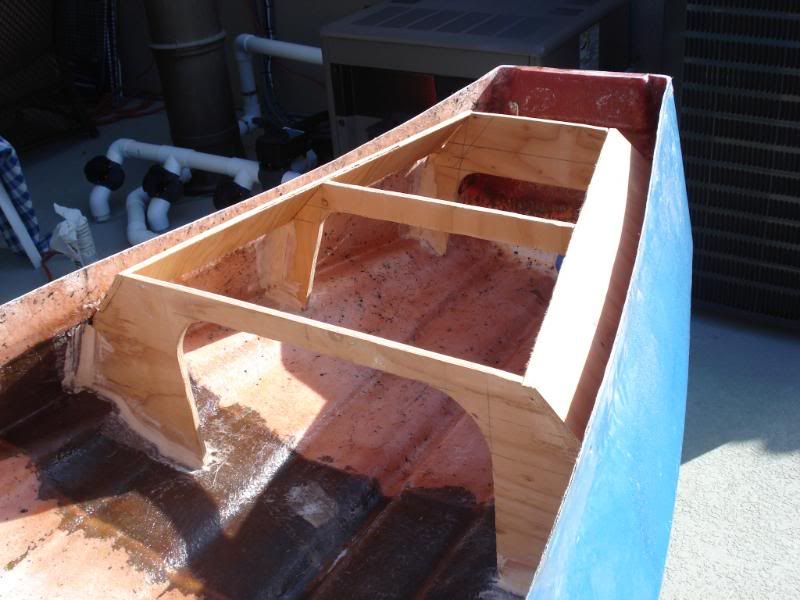
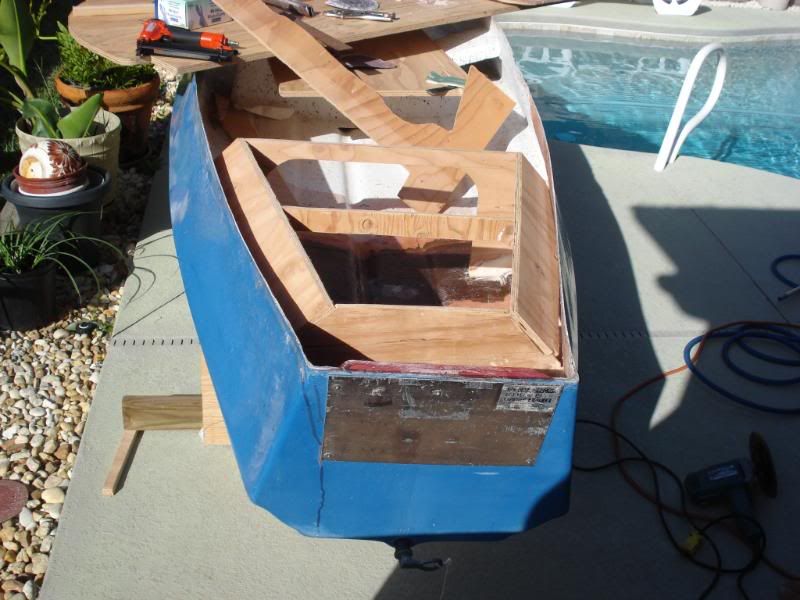
Now, since we made the deck 1 inch above the rub rails, we left a gap between to deck and the transom so we could put my motor on. We added a cleat ½ inch under the bottom of the top part of the transom, so we could add in a piece of plywood. 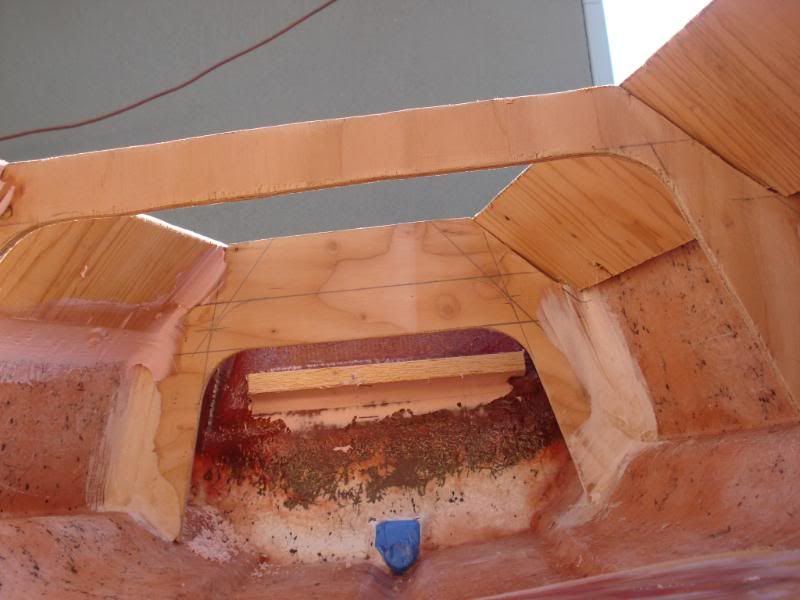
Took more templates and gunked (puttied) more wood in place. 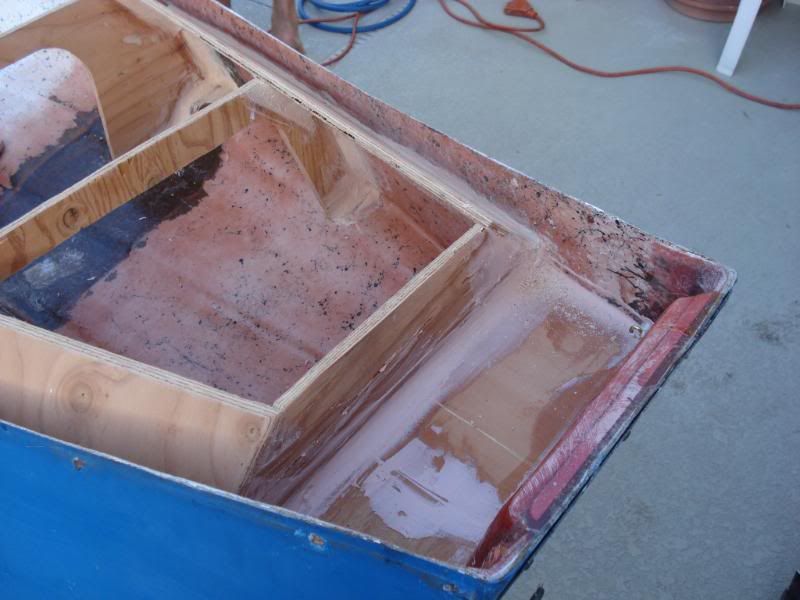
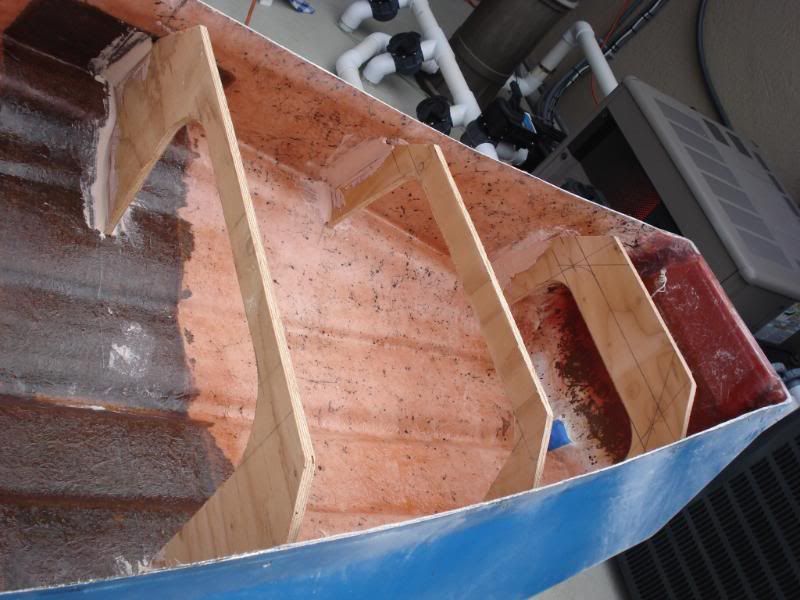
So here is what she looks like up to this point: 
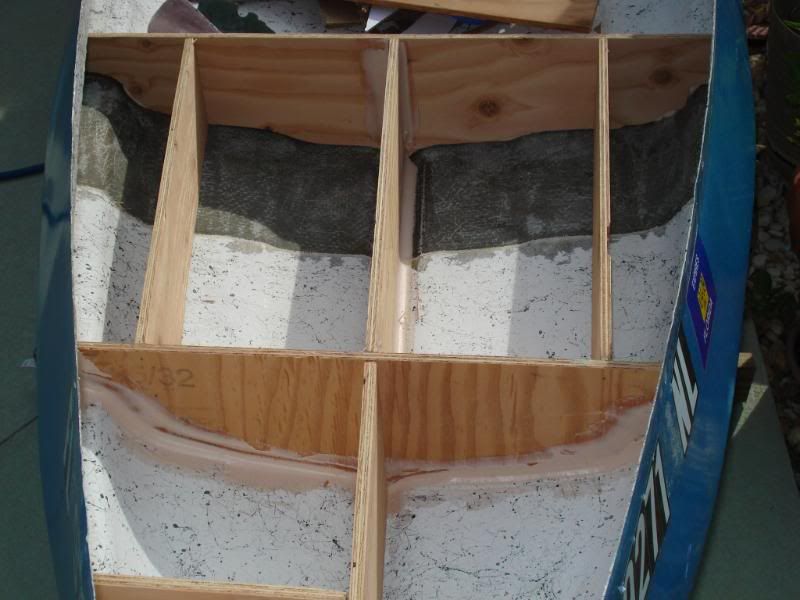
We glassed the inside of the ribs with 4 ounces of 'glass. Here she is after we grinded the excess down. 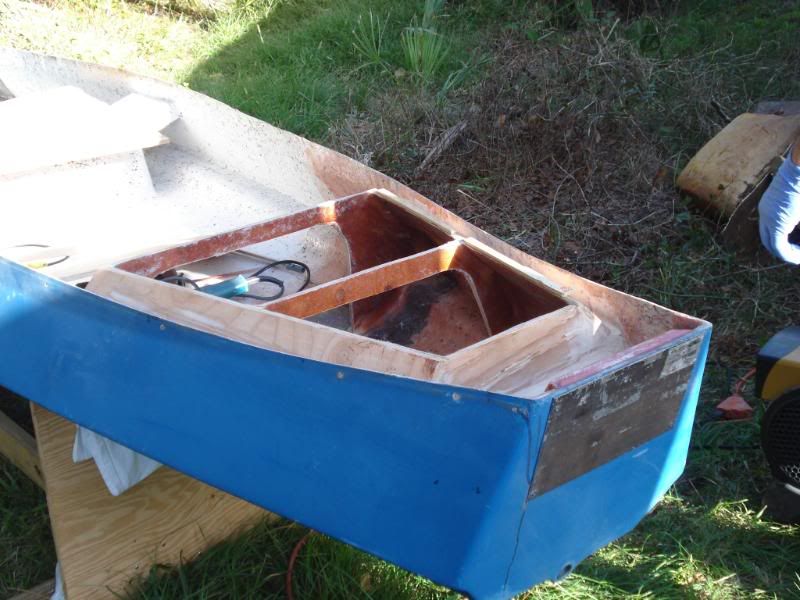
Now we were at the point where we could take a template for the top of the deck. We cut a piece of ½ inch plywood and gunked it in place and stapled it. We also beveled it so it wouldn't be a sharp edge. 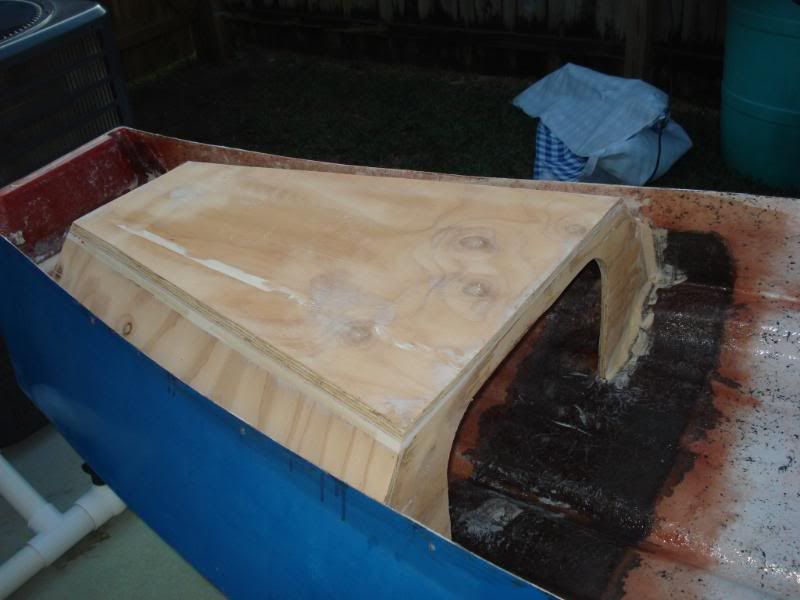
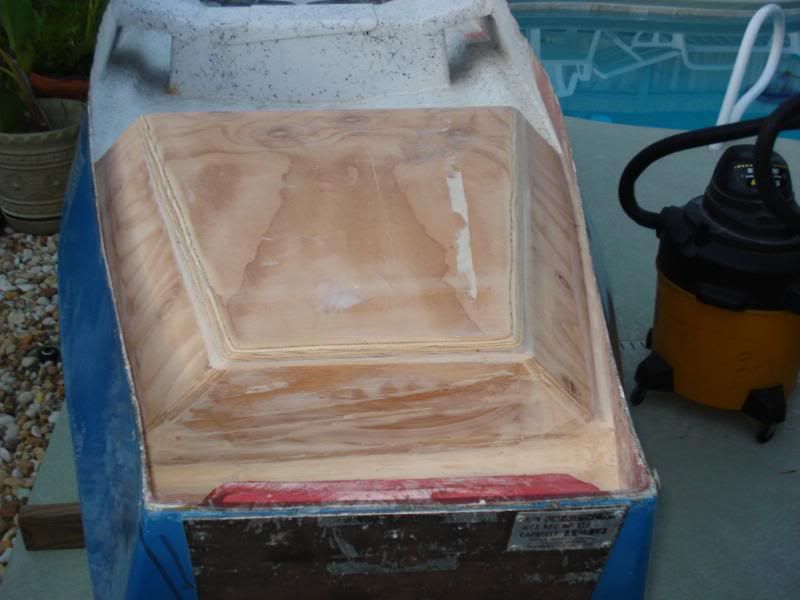
It's a little blurry, but here's a pic of her insides. 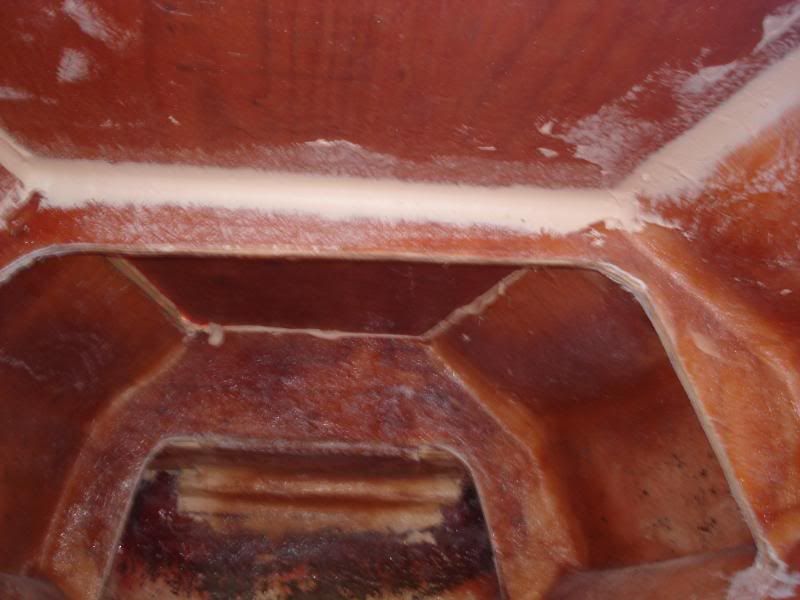
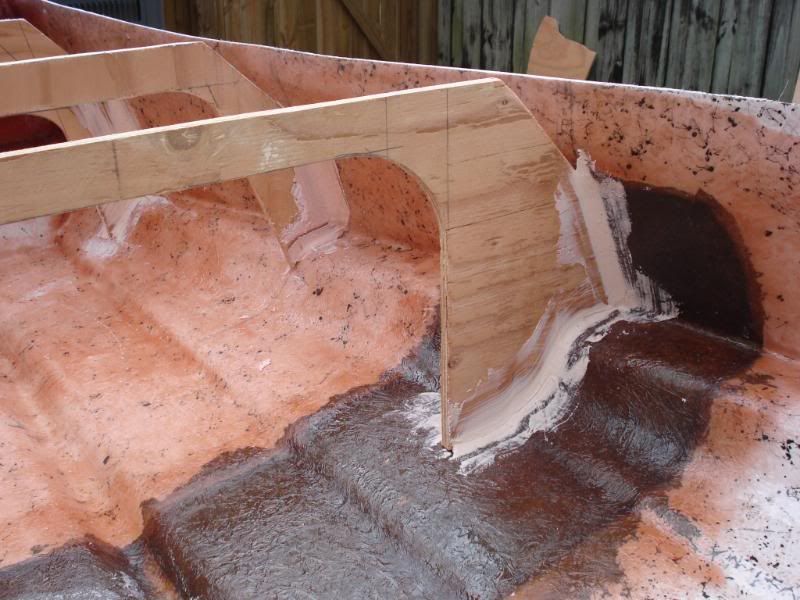
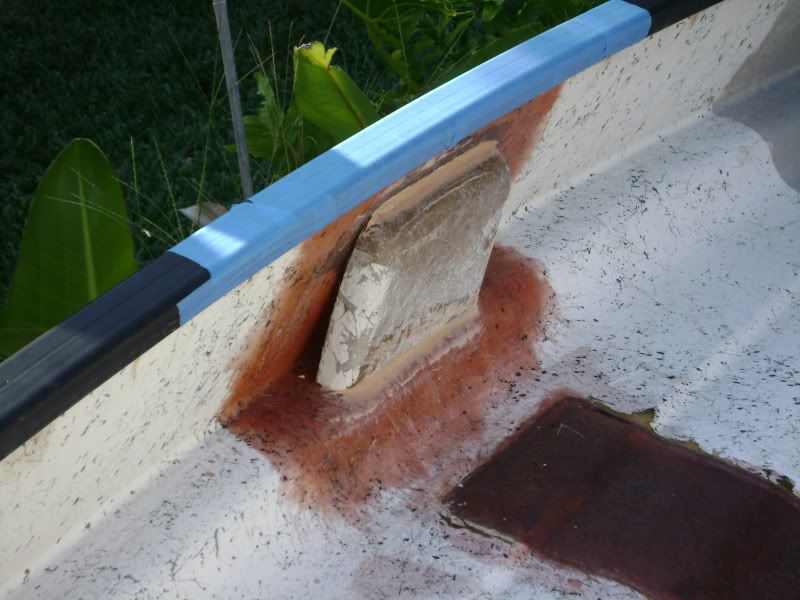
Remember earlier when I said the transom was off. This will give you a better perspective: 
She wanted 4 more ounces of 'glass on her outsides so we gave it to her. 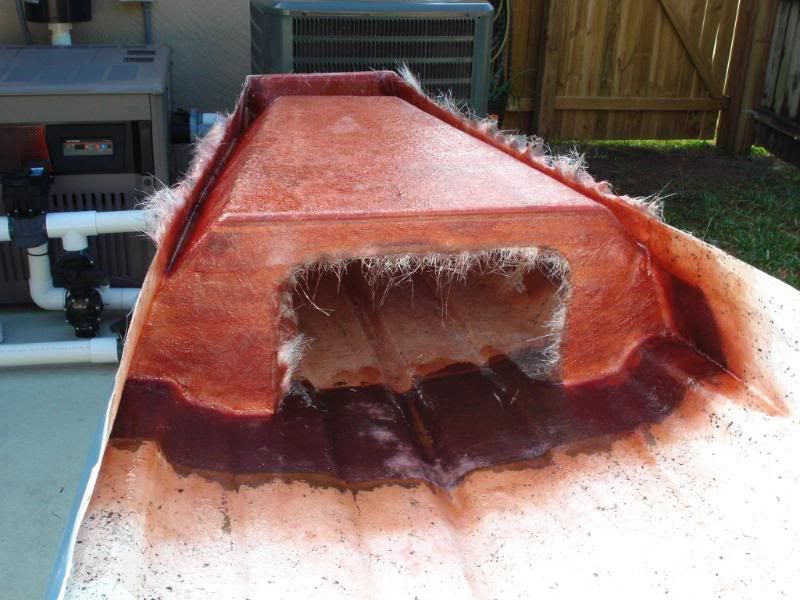

Here she is ground down. 
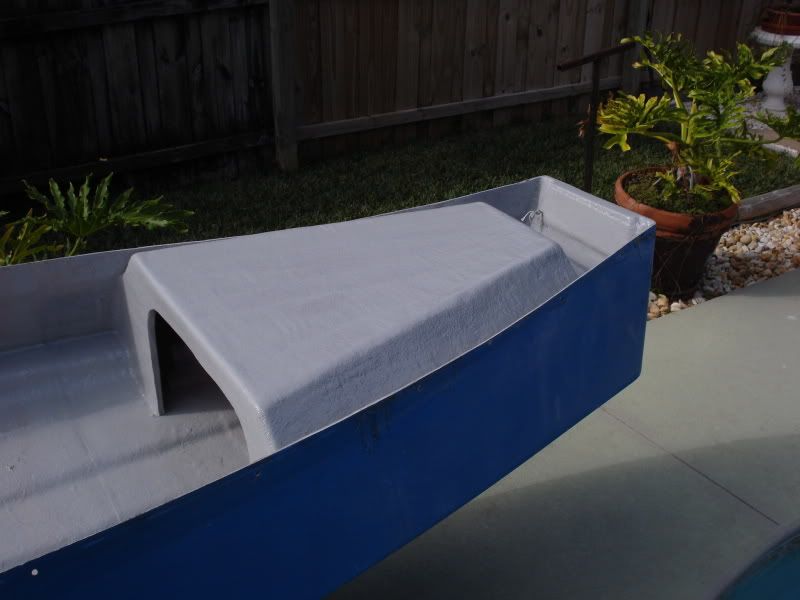
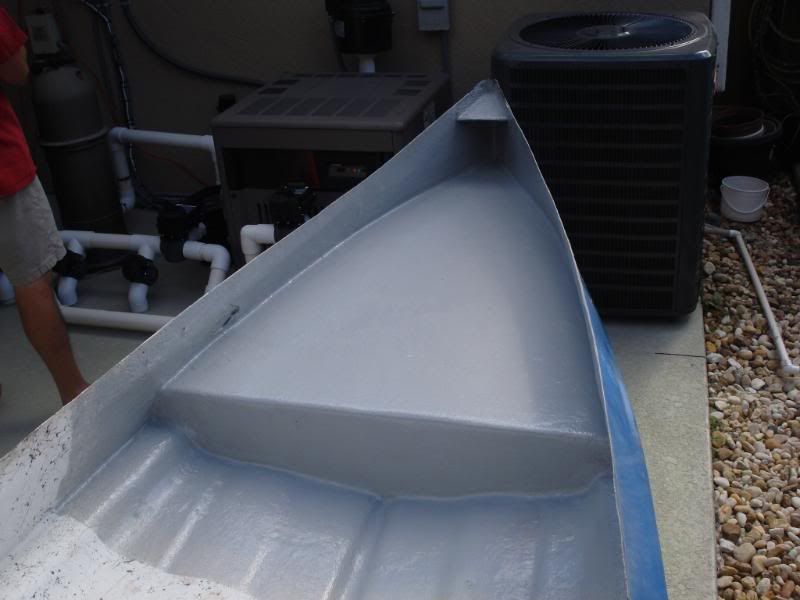
Now we had to move on to the bow. I wanted a deck that was high enough to be more than a false floor and low enough not be a full on deck. The process started off the same as the stern. The front seat was removed and grinded down. We took templates and made some cuts. Once we settled on the right height, and sighted it in with the rear deck, we gunked it in place. 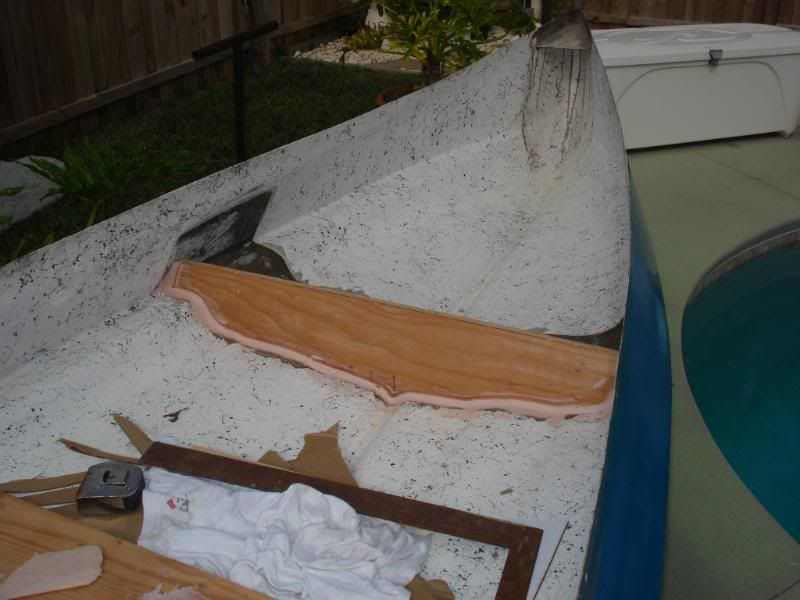
To support the deck, more supports were made. 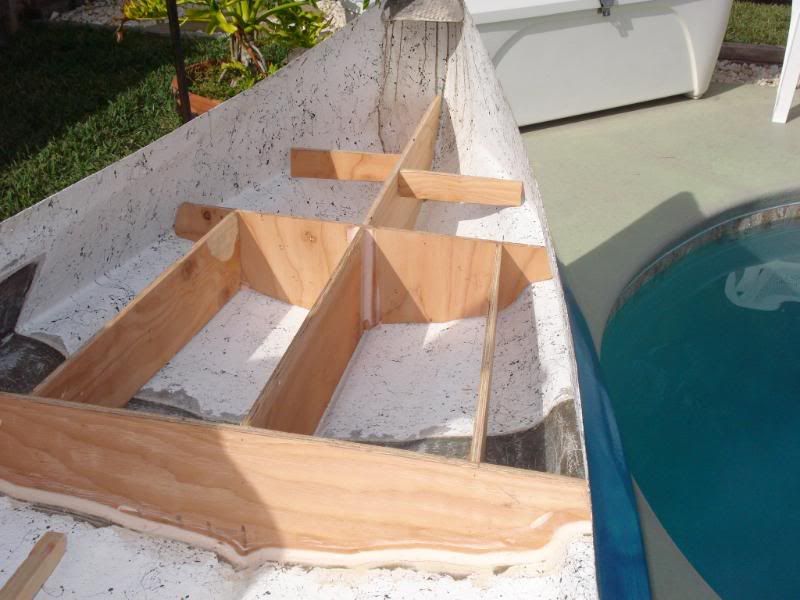
They were then puttied in place and glassed. We grinded the excess off after this picture. 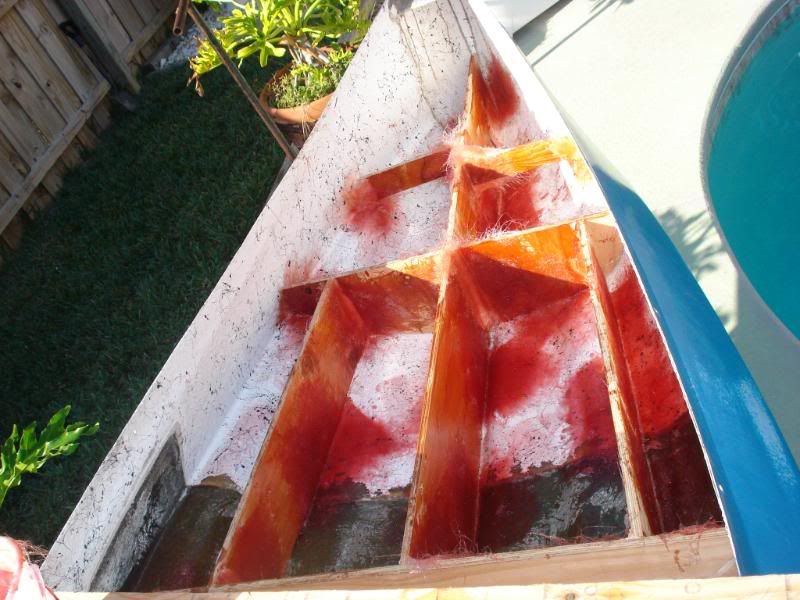
We had to take another template and cut a top piece of ½ inch plywood. We stapled it in place and gunked around the edges. 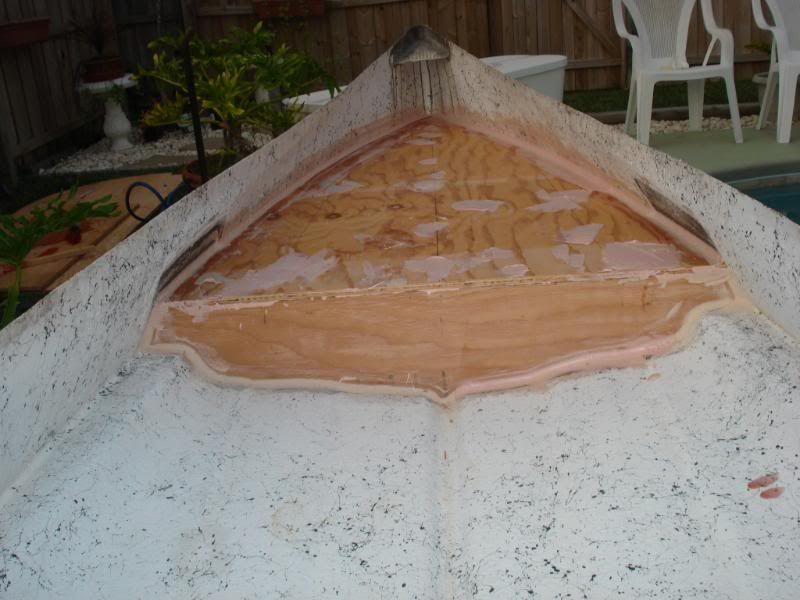
Of course, after we gunked the piece in place, we figured we should have put some foam underneath the deck for buoyancy incase we managed to get a leak in the hull. This was fine though, because we just drilled some holes and sprayed 15 cans of foam, yes 15. It cured to the bottom of the plywood so that was extra bondage. 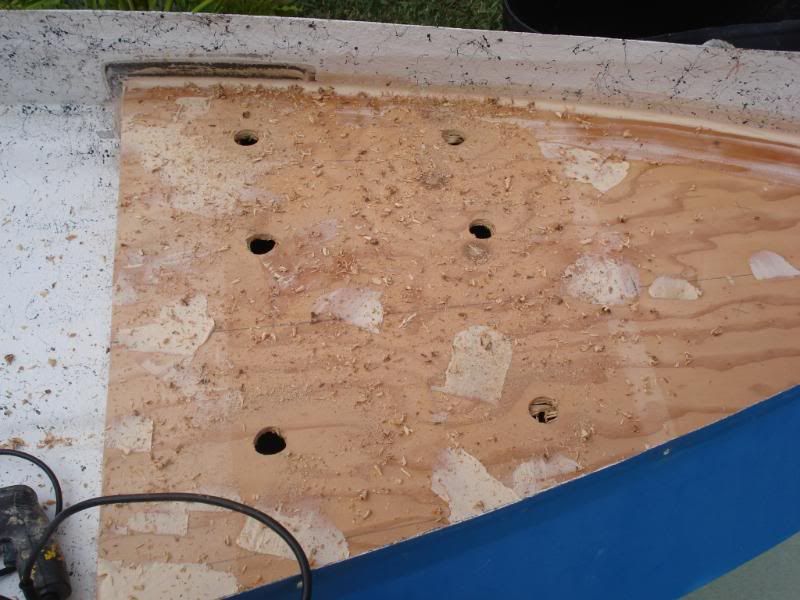
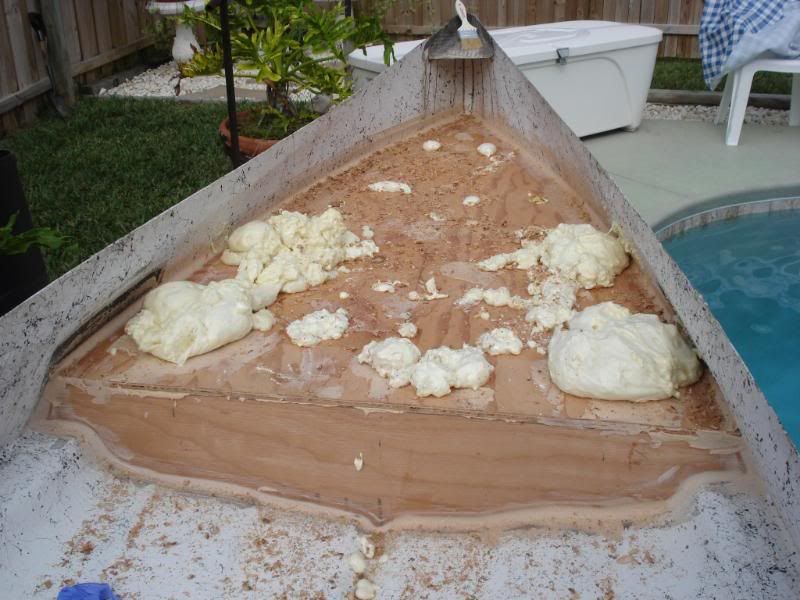
I didn't grab a pic but we had to grind off the excess. We then gunked over the holes and sanded that flush. It started getting dark but we still wanted to go ahead and glass the front deck. So we did. We laid out 4 ounces of 'glass and put some resin to it. The pictures may be a little distorted because of the lighting. We laid a spotlight on the middle bench seat to get some heat on the 'glass to start curing it. 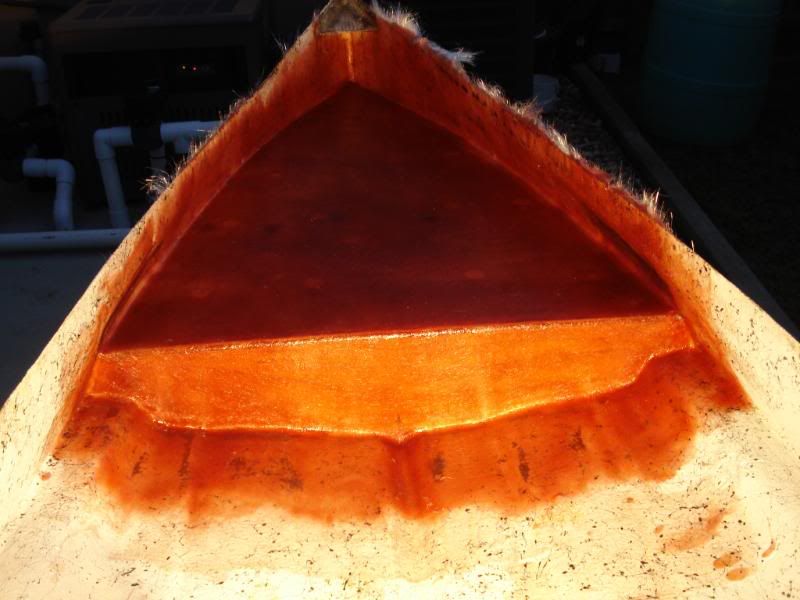
Well, this is where we stopped for tonight. So more pics next time we go at it. |
|
|
|
|
|
12/18/2008 09:57 PM
|
|
|
NIce!!! cant wait for the finished product!!!!
------------------------- It's not how big the wave is! It's how you surf it! Primus sucks! PLayalinda sucks!!!! GO BRONCOS!! The #1 cause of accidental death 4 yrs and younger is drowning!! 407-855-SAFE!!! infantswim.com |
|
|
|
|
|
12/19/2008 04:55 AM
|
|
|
even if you voted for Ron Paul, it's a great looking job so far.
why 4 oz glass instead of 6? just wondering what total weight will be in comparison. sdt ------------------------- crazy like a fox! ha ha > Vote for Rewind Cain, he'll get it right....eventually. |
|
|
|
|
|
12/19/2008 06:14 AM
|
|
|
even if you voted for Ron Paul, it's a great looking job so far. why 4 oz glass instead of 6? just wondering what total weight will be in comparison. sdt I don't really want to add too much unnecessary weight. 4 oz. should be plenty enough to keep all the moisture out and bond everything. |
|
|
|
|
|
12/19/2008 01:42 PM
|
|
|
Nice project! I was also wondering if the gell coat was knocked down where the bulkhead and gunwale areas are before you gunked/glassed them?
------------------------- Silence is golden, duct tape is silver. Edited: 12/19/2008 at 01:45 PM by thole |
|
|
|
|
|
12/19/2008 02:09 PM
|
|
|
Thanks! Yeah, the pictures aren't really good for showing that but we did etch it up pretty good with 40 or 60 grit (I cant remember exactly) and cleaned it up before we did any glass work.
|
|
|
|
|
|
12/19/2008 04:18 PM
|
|
|
Whoa Nellie! 15 cans of spray foam? $$$
I have some good size chunks of 1 lb. eps foam in my attic in case you want to do this again. |
|
|
|
|
|
12/19/2008 05:14 PM
|
|
|
Ha yeah..it was a lot. Hopefully I don't have to but I appreciate the offer. We started off with 5 cans and after about an hour drilled some holes to check if it filled out all the way and it didn't. So, we filled the new holes up. Better to be safe than sorry, I guess.
|
|
|
|
|
|
12/19/2008 05:30 PM
|
|
|
I ended up getting pretty busy today and didn't have time to get much accomplished. What I ended up doing though was putting a little less than a pint of gel coat on the exposed 'glass to seal it up a little until I paint it later. First thing I did was check for air pockets and grind down the edges of the glass and etch up the surface in the bow that cured over night. Then, cleaned it up with the vacuum and used the air compressor to blow it off. After that I used some Tack Cloth to make sure it was clean.
|
|
|
|
|
|
12/21/2008 08:58 AM
|
|
|
looking like some good quality work happening, interesting project.
15 cans of foam..lol....yep, better safe than wet! nice looking work! sdt ------------------------- crazy like a fox! ha ha > Vote for Rewind Cain, he'll get it right....eventually. |
|
|
|
|
|
12/22/2008 11:49 AM
|
|
|
Wow thats outstanding!
I can hear the fish screaming already |
|
|
|
|
|
12/23/2008 06:53 AM
|
|
|
Sweet!!! No Popcorn on Emoticons so I will use:

Waiting on next installment. Beware Reds in skinny water!! Happy Holidays Bratsch!!! Sweet present to self! |
|
|
|
|
|
12/29/2008 08:07 PM
|
|
|
Great work! I need you to come over to my house and help me with some of my projects. I had a 13 ft gheenoe and wanted to do almost the exact same modification but had no clue how to do it. Anyways that will be a shallow water machine by the time you get it rigged. Good Luck!! Post some pictures of it in action.
|
|
|
|
|
|
02/17/2009 10:27 AM
|
|
|
Great job, I've done many projects like that. The quality of your work shows.
I don't use wood anymore, Using a composite called Coosa. Lighter/no rot. ------------------------- Luv this forum and sunrises. |
|
|
|
|
|
02/22/2009 07:34 AM
|
|
|
what are you using for putty?
------------------------- Skate or Die! or surf, or fish. |
|
|
|
|
|
04/30/2009 07:37 PM
|
|
|
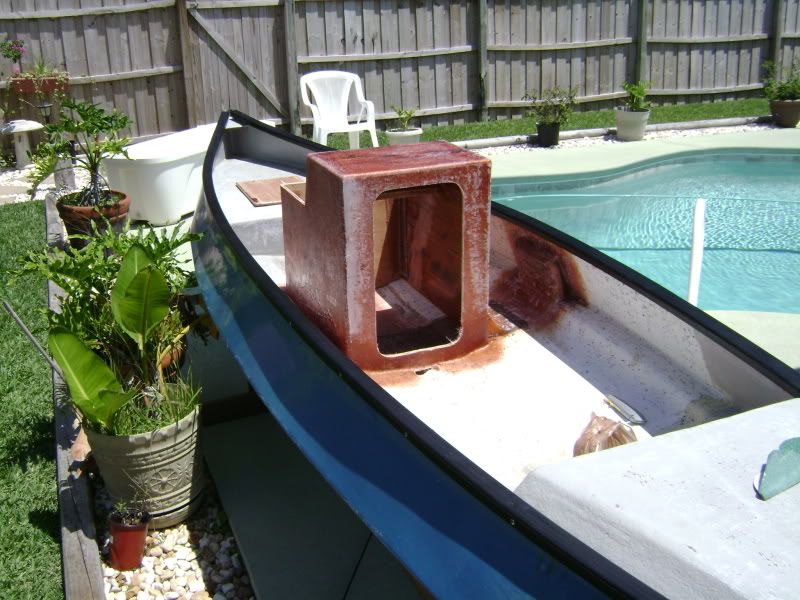
Okay. So finally I got a little bit of time since I took my last final on Tuesday. This is what I've been up to. I still had a couple of gallons of resin that was still good as well as more than enough fiberglass to make a center console. I had a 21in x 12in hatch laying in my garage so I figured it would come in handy with this idea I had. On another Gheenoe from the Custom Gheenoe forum I admired a center console that was put in with a hatch facing stern. I wanted to make the console big and tall enough for someone to sit comfortably on as well as high enough to stand on and large enough that I could throw all of my tackle boxes and life jackets in... I know, I know. Bad idea on throwing the life jackets in there but it clears room.
First step, the center bench seat needed to get cut out and ground flush. Here's a pic midway through cutting it out. 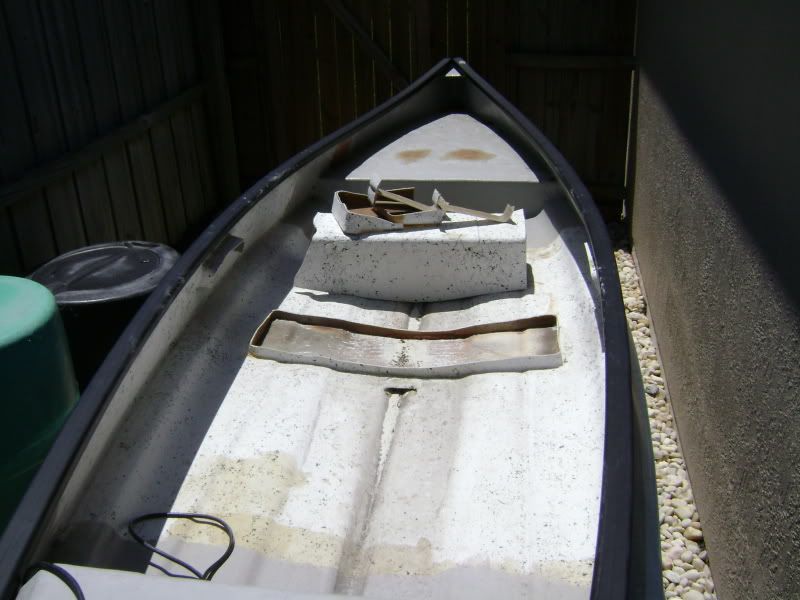
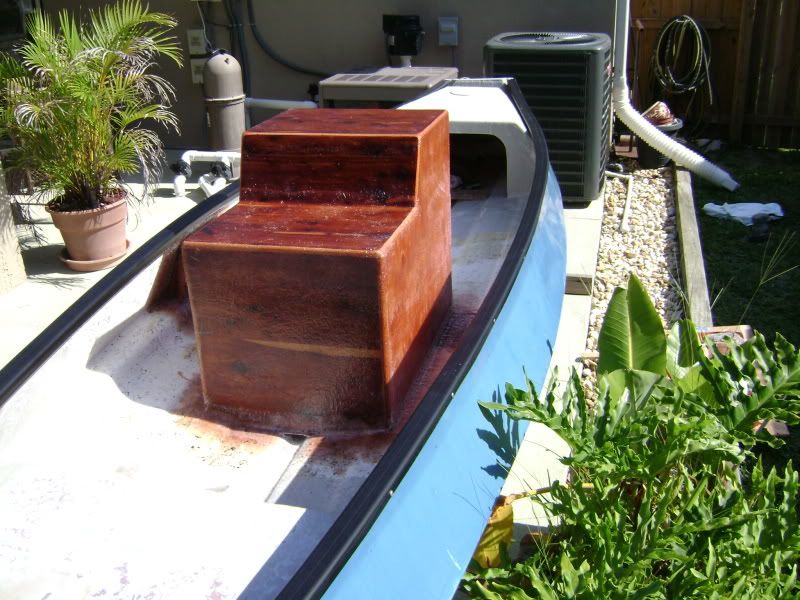
Once that was done my dad and I came up with some sketches of the console that would fit our needs and then we made it happen. We made it out of 1/2 inch Cedar. The forward top was left off because we originally planned to patch the inside of the console to the deck but later decided that, to keep unnecessary weight out, we wouldn't. 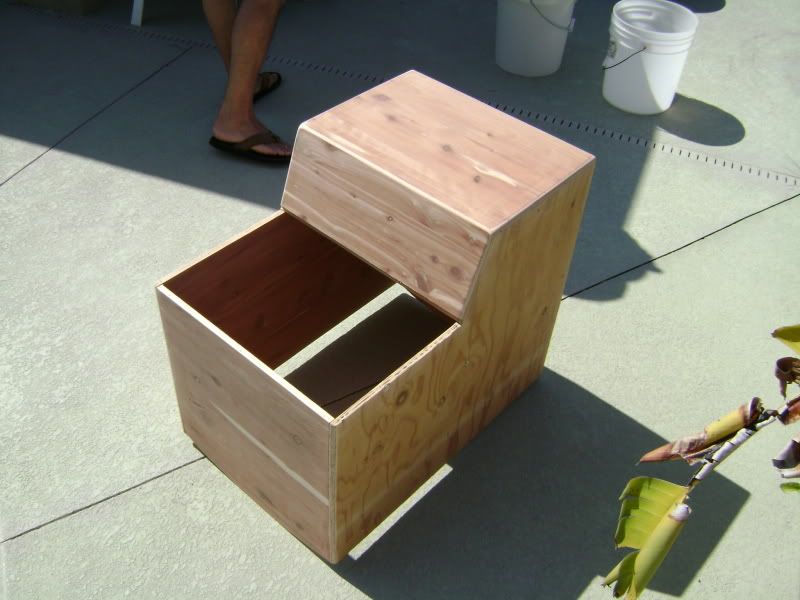
Once this was assembled and the seat ground down, we floated it in my pool to try and guess the weight distribution as far as how far forward the console should be. It's a rough guess but we put 90lbs in the stern and a battery in the bow. We also got in it to get a feel. 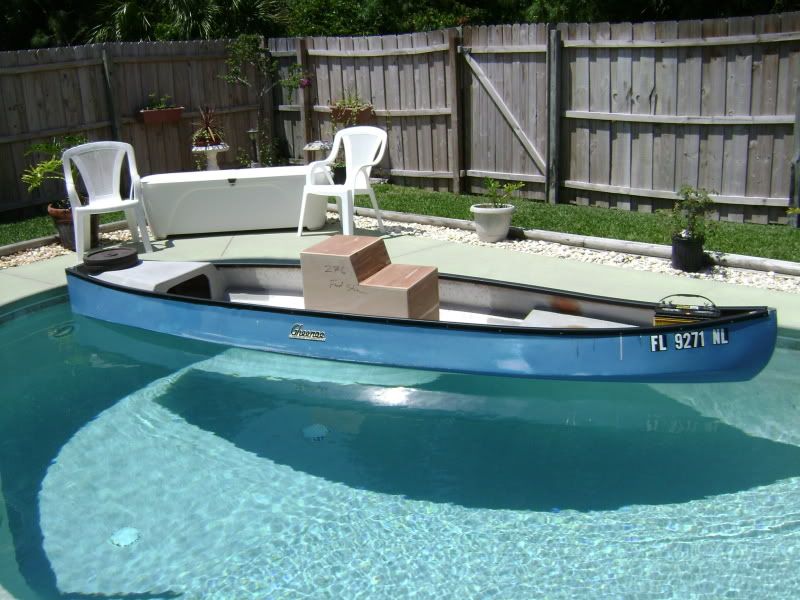
At this point we took the Gheenoe out and glassed where we took the bench seat out so that it would be flush with the rest of the deck, as well as glassing in the side. For the rest of this project we used mostly 4oz glass. 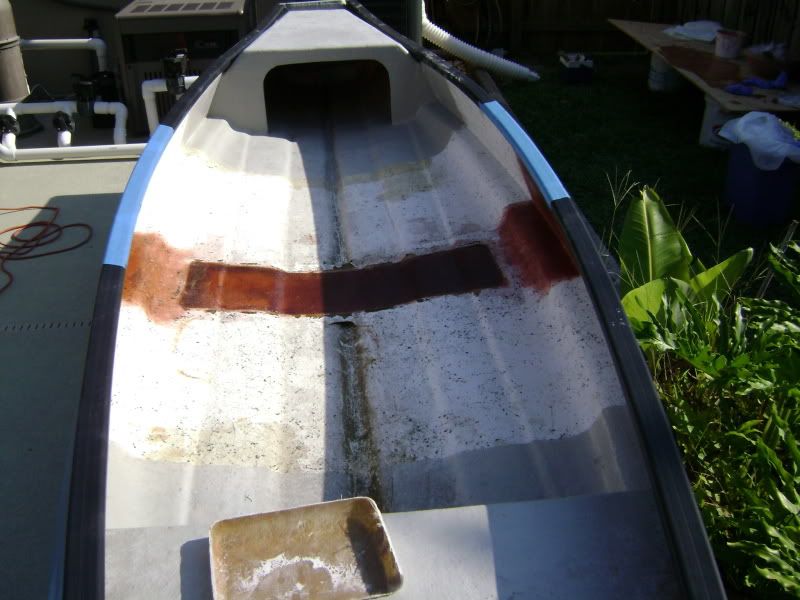
To answer the question of how were we going to support the sides, we kept part of the seat we cut out and used these pieces. 
From here we puttied them in place so that we could glass over them. 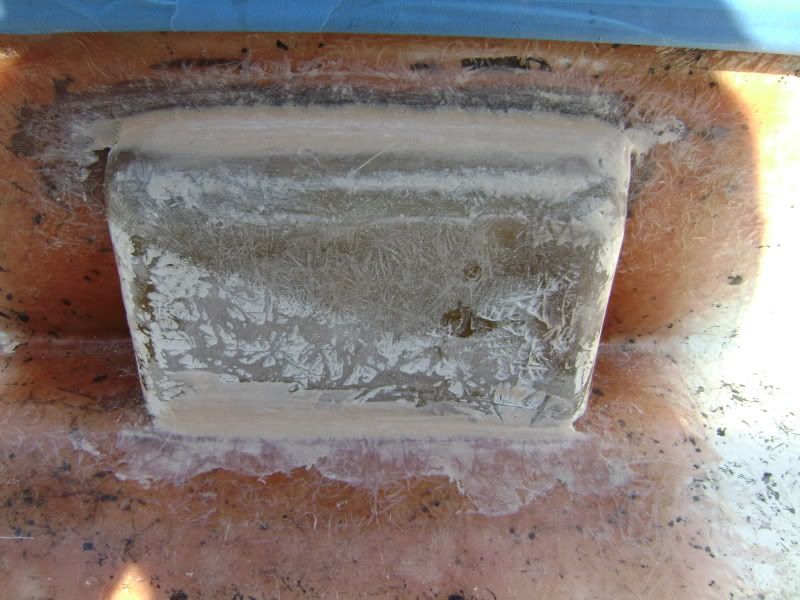
Since we decided to make the console water tight and didn't see the need in making a wooden floor, we had to figure a way to go over the drain. We put blue painters tape on a piece of wood and covered it in Turtle Wax. From this we threw a couple of ounces of glass on the now waxed tape and rolled it with resin. After it cured it pulled right off in a straight piece due to the wax and the resin not sticking to the tape. We measured the piece so that it would come out ½ inch from the back and front of the console. We tied it in with 2 ounces of glass. 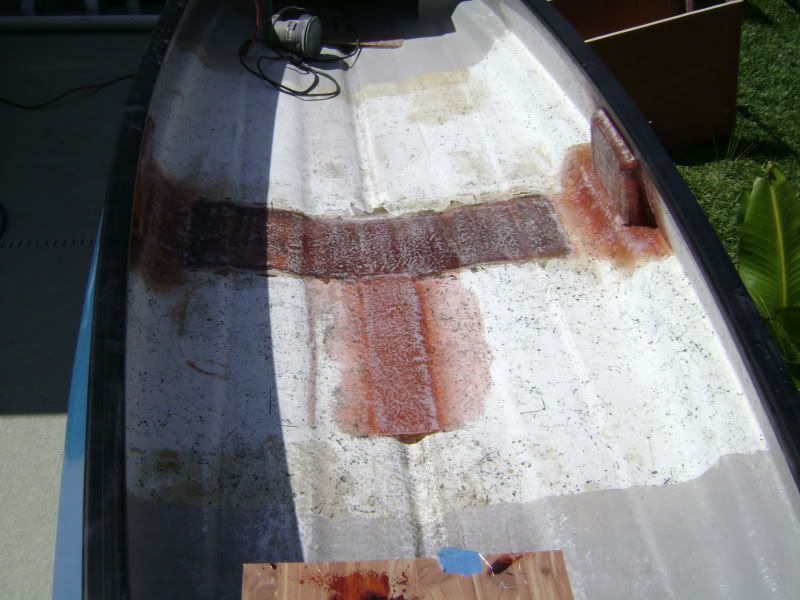
During this time we glassed the entire console with 4 ounces, except for the front top, and were ready to tab it in place. We measured a couple times and sighted it in with the rest of the decks we put in and made sure it was level. At this point is when we decided to not patch the inside so instead we caulked the inside perimeter. After that we caulked the frame of the seat and nailed it in place with a nail gun so that it would be water tight and wouldn't move when we glassed it in place. 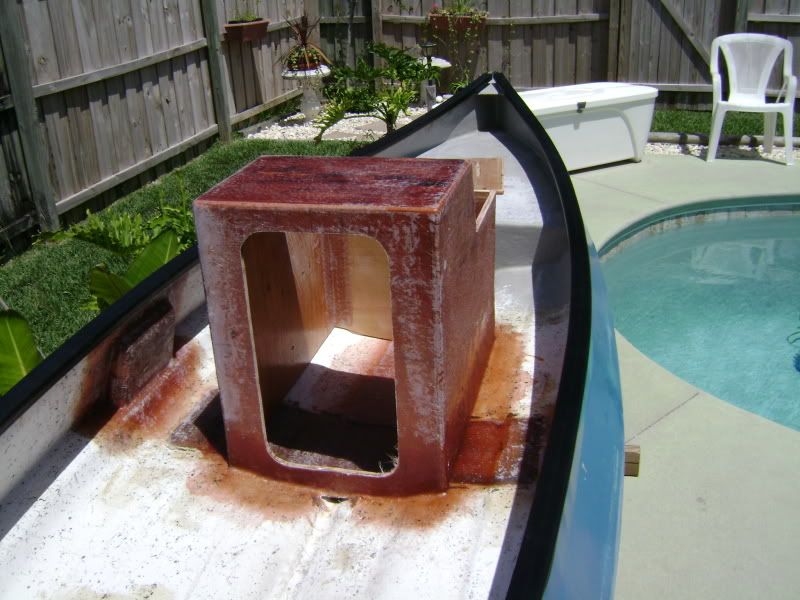
At the end of this we put in a 4 and ½ inch Pie-I in the stern deck. 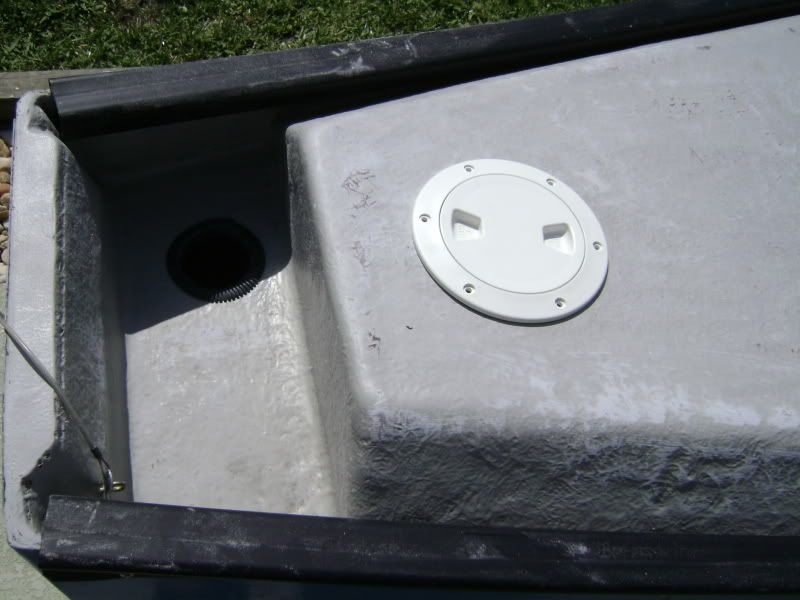
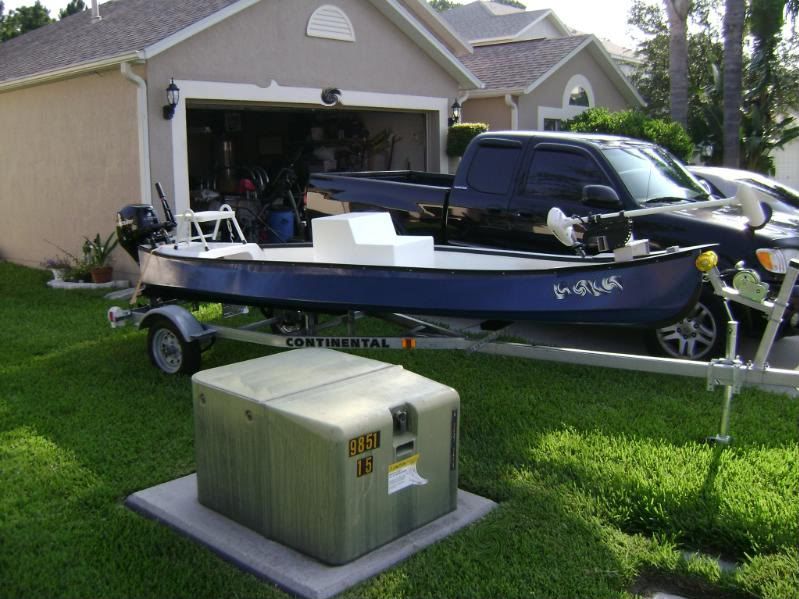
That's all for now until I get her painted. I'm thinking either Key Lime outside and I'm undecided on the inside or Black outside and Tan inside? I'm anxious to get her on the water and see how she rides with the upgrades. But until I get a trailer that won't happen because throwing the Gheenoe in the bed of the truck with the motor/gas/tackle is a P.I.T.A. Hopefully this weekend I'll get a chance to snag one. |
|
|
|
|
|
05/01/2009 03:37 AM
|
|
|
Jb,,,wow that is way far cool....Saw a dude out in a black one with four rod holders and,,I think a 25 merc with a tiller this past week end. Out of the 5th St ramp CB. He said he got some oversized reds but got beat up with the wind coming across from MI.
good luck with the gheenie. Can't wait to see the finished product. ------------------------- So if you are a surfer I wish you the prosperity that allows you more time to pursue the salt water dream, and the true happiness that comes from warm water, clean waves and the companionship of your fellow surfers. If you are an internet troll just spewing bs then f off. |
|
|
|
|
|
06/17/2009 06:16 AM
|
|
|
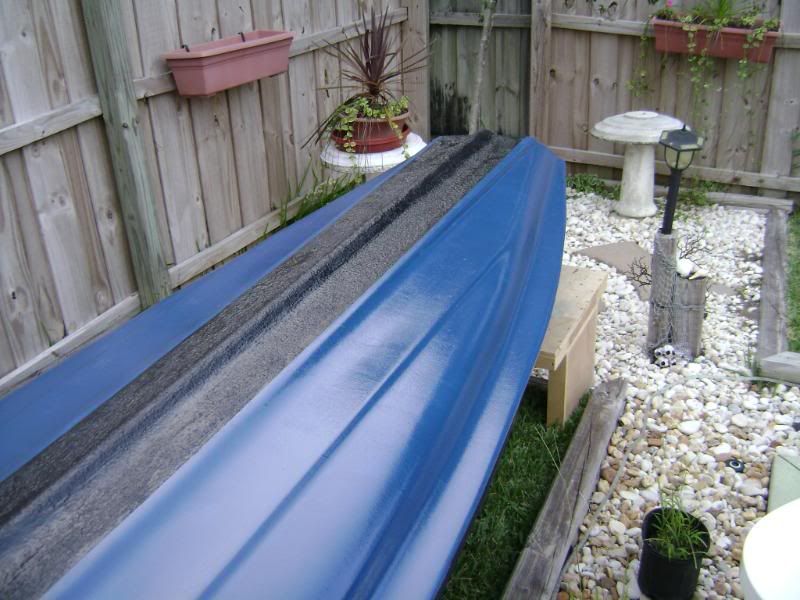
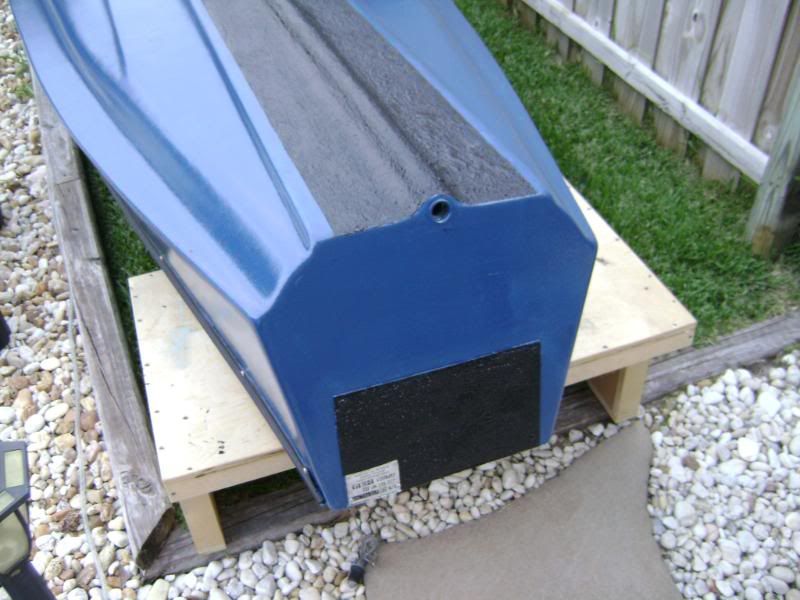
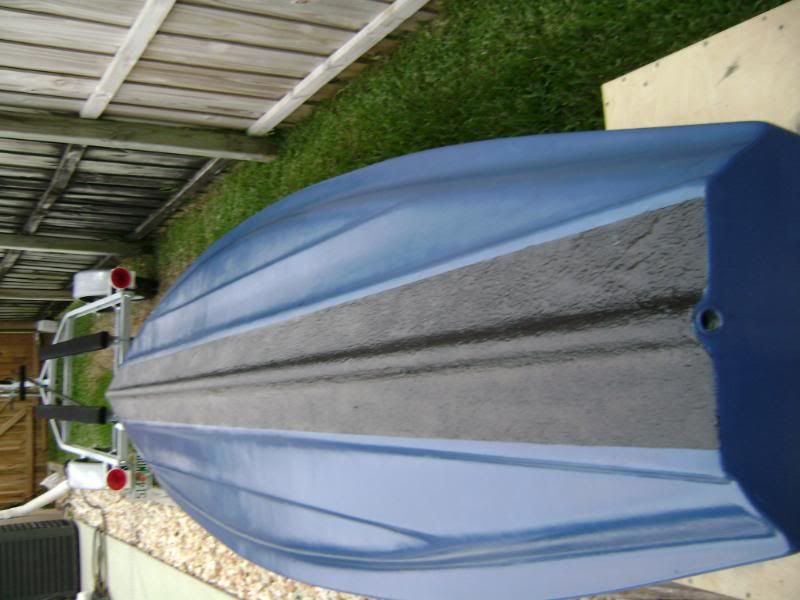
Well it's been a little while since I've been able to get any work done on the Gheenoe. At the last time, I had just gotten my trailer and the boat still needed to be Gel coated. Originally I wanted a Key Lime or Black exterior. However, with Gel coat being so expensive, I opted to use what I could get my hands on. The end result that I went with was a dark Sea Ray blue. I started by taping off the rub rails and sanding/scuffing the inside of the boat. I forget exactly what grit we were using but I believe it was 80 grit. We cleaned out the dust/dirt/etc to get it ready to paint. I had accumulated almost a gallon of White 944 Gel coat. The compressor that I have wasn't really doing a great job of spraying with the gun I planned on using. So, we rolled and brushed the white. I didn't take any pictures of this stage.
After the inside was complete and dried, the fun began! My dad and I had to pick the boat off the trailer and flip it so we could get the bottom coated. It was a little awkward given the space that we were confined to and the height of the console, etc. but we managed. Once that was flipped, sanding began. We started using an 80 grit paper on the D.A. sander, but that was short lived due to a faulty and rotted rubber pad. While my dad drove up to Lowe's, I continued by hand. That sucked! Anyways, we got the boat prepped. Since it was the middle of the day, we had to cover the working area with umbrellas and let the boat cool off. Ideally, we would have liked to spray the gel on. But due to the compressor, and being content with the result of rolling the inside, we stuck with rolling and brushing the bottom. Since this was the case, the paint was thinned down so we could spray it since we only had 2 quarts. It lasted longer than we had thought 2 quarts would, but it is still a little thin. When I first got the Gheenoe I noticed that there were some chips on the keel. So, when we were glassing everything else in, we filled them in lightly with putty and glassed over them. They were sanded down as well. Not wanting this to happen again, I ran across a product Herculiner which I could roll on the keel. Same concept of Rhino Liner but this comes in a single quart or gallon. At Wal-Mart the gallon was $79 and quart was $19. Mind you, the quart covers 20 sq. ft. Once the gel dried we taped off the section we wanted to coat with the Herculiner and went for it. 
We caulked and screwed the hatch in place on the console. My uncle fabricated and welded an aluminum trolling motor mount for me that we then put over a splash guard that we had made a few weeks prior. 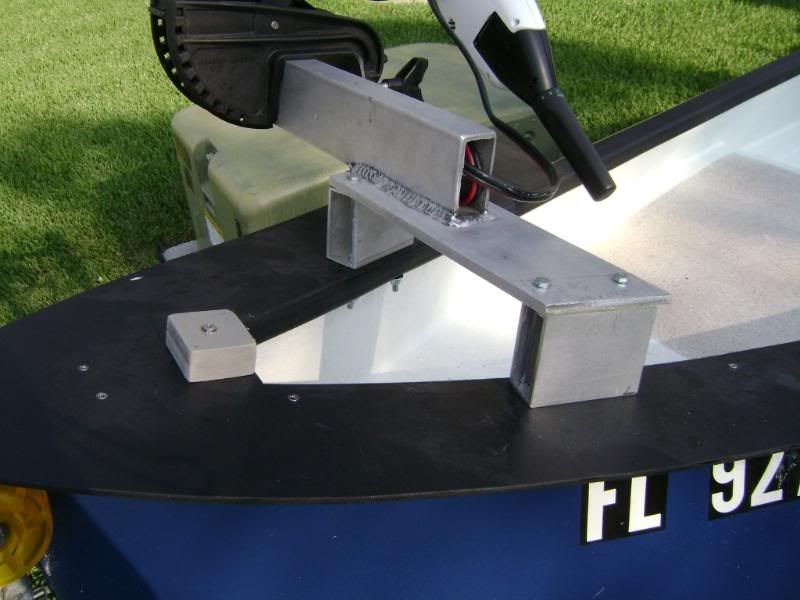
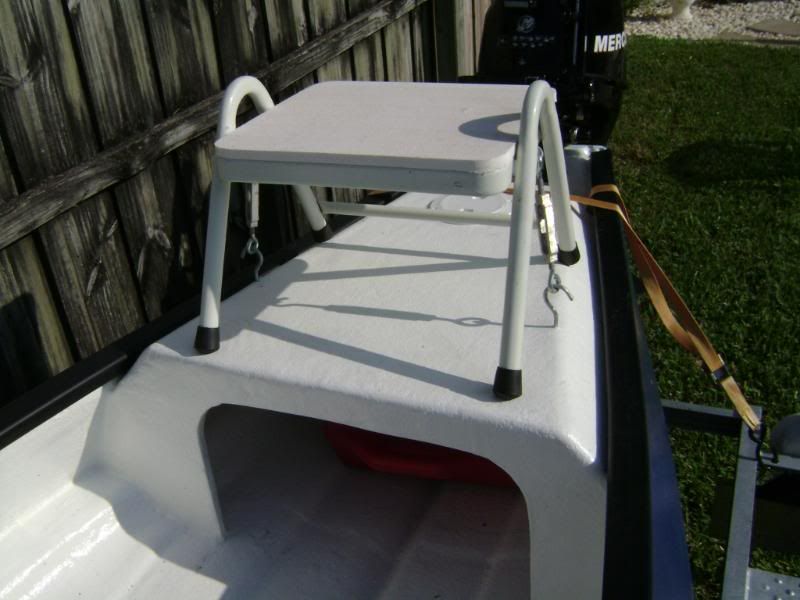
While at Wal-Mart, I had came across a $7 step that was on clearance. When I got home I bolted on a piece of starboard and put down some non-skid tape. On the rear deck/platform, we installed 2 hooks as well as 2 eye bolts on the side of the step. These were connected with a turnbuckle. --- a cheap alternative to buying a poling platform. It's very stable and its actually at a really comfortable height to sit on and drive the boat. 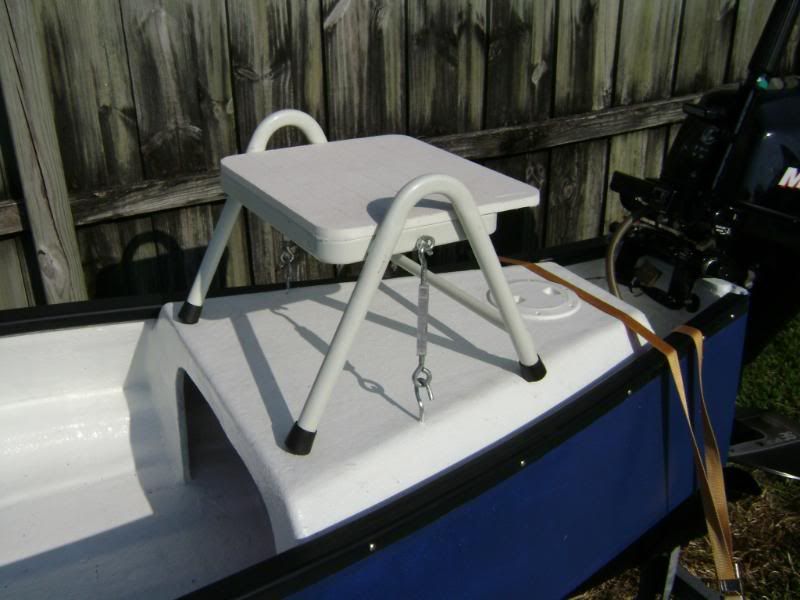
The only thing really left at this point was to do something about the slight glare from the bare white gel coat. Having the tan hatch on the console, I went to Lowe's and picked up a can of interior/exterior textured stone spray that $9 for the can and $9 for the clear coat. I taped off the front deck where I wanted and also the top of the center console. I sanded it down with 40 grit and sprayed. 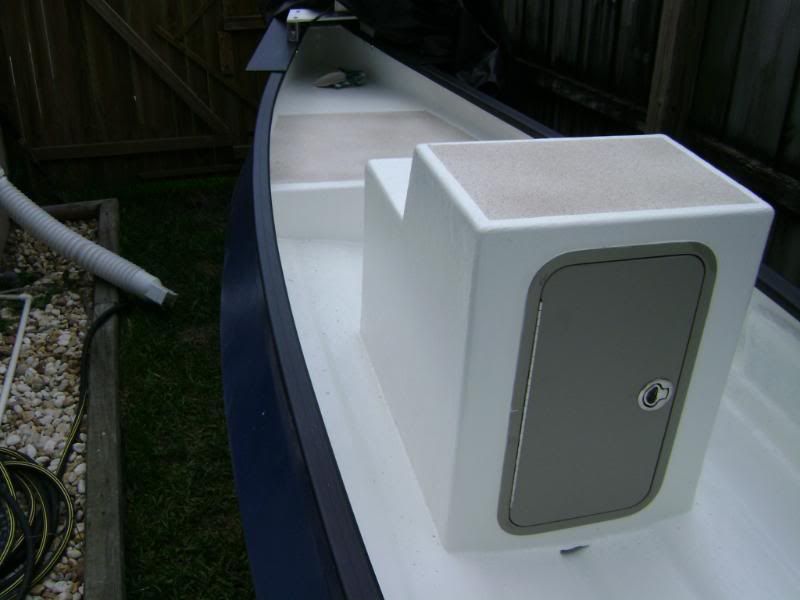
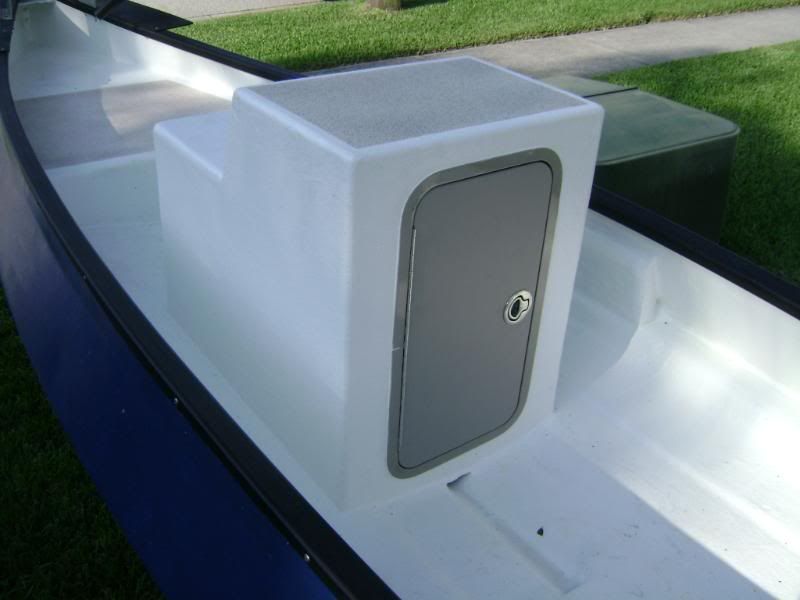
In my opinion, it looks AMAZING and performs perfectly. I've used it in the water and it doesn't come off. I plan on doing the same for the rear deck and back floor. But that's all for now. 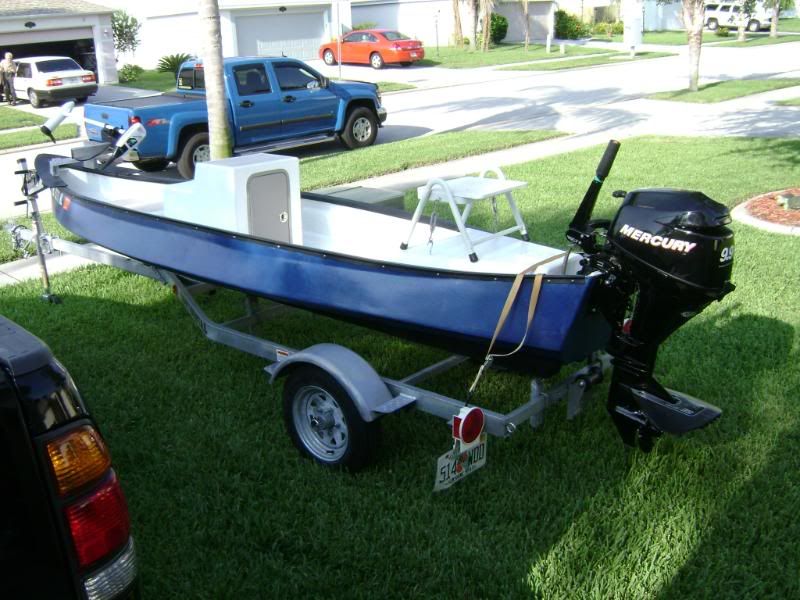
Edited: 06/17/2009 at 08:40 AM by JBratsch |
|
|
|
|
|
06/17/2009 09:52 AM
|
|
|
J
You and your dad have done a great job. I've enjoyed watching/tracking the progress. What a great project. I hope you catch a lot using it. Just in time for Father's day!! Enjoy!! |
|
|
|
|
|
06/17/2009 10:03 AM
|
|
|
Thanks!
|
|
|
|
|
FORUMS
:
Fishing
:
Rebuilding the Gheenoe!
|
Topic Tools |
FuseTalk Basic Edition - © 1999-2025 FuseTalk Inc. All rights reserved.